Stripe Checkout Example
This example will walk you through the necessary steps to accept payments with Stripe Checkout and a simple HTML form. Out of the box, our forms support multiple one-time and recurring products to make it as easy as possible for you to create flexible pricing options.
This example builds on the Basic Form Example and will cover the changes need to accept payments using Stripe Checkout.
Overview
- Connect Stripe to your Formeezy Account
- Ensure your form includes a hidden input named "price_id"
- Using Stripe Checkout for a single product
- Using Stripe Checkout to bundle multiple products
Creating an input with your Stripe product Price ID
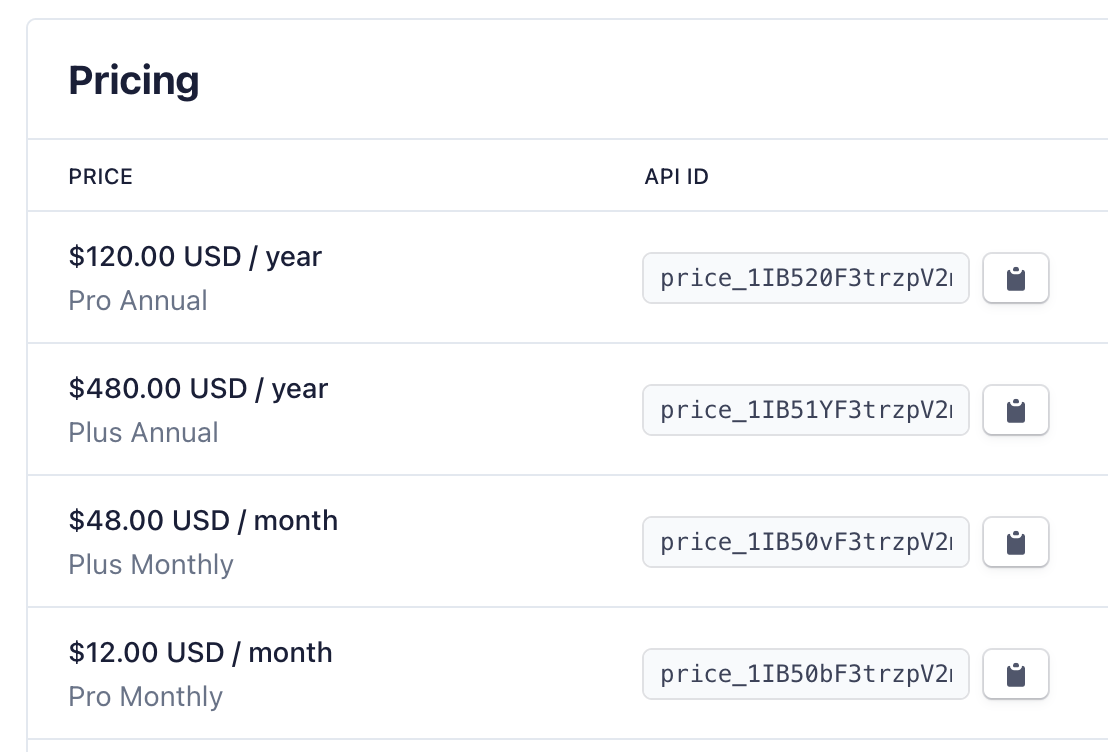
To enable Stripe Checkout on any Formeezy form, simply add an input named "price_id", with type "hidden, and include a value set to the ID of your product. You can find the ID to your product by exploring your product prices inside of Stripe.
<input name="price_id" type="hidden" value="price_xxxxxxx"></input>
Screenshot of Stripe Price IDs in dashboard

Using Stripe Checkout with a single product
Now that you have your input created, let's add it to a form. You'll want to add your Stripe enabled Formeezy endpoint here as well. If you need to activate Stripe payments in your account, you can do so on your form's settings page.
<form action="{Formeezy-Endpoint}" method="POST"> <input name="price_id" type="hidden" value="price_xxxxxxx"></input> </form>
Using Stripe Checkout with multiple products
If you would like to create product bundles or pricing options like one-time setup fees, simply add multiple comma separated price ids to the value of your input. You can add as many as you like, and they will be visible to your customer in the Stripe Checkout session we create for you.
<form action="{Formeezy-Endpoint}" method="POST"> <input name="price_id" type="hidden" value="price_1xxxxxx, price_2xxxxxx, price_3xxxxxx"> </input> </form>
Stripe Checkout Use Cases
- On a landing page with a "Buy Now" button
- Use multiple forms on a Pricing page that includes various plans and options
- Create monthly and annual plans and dynamically change the price_id using JavaScript
Notes
- Make sure you have enabled Stripe Payments on your form - They are disabled by default.
- Ensure that you've connected your Stripe account to your Formeezy Acccount
- Feel free to test your integration using Stripe Test keys and Test products (Live products will not work)